Sword in the stone brief. Concentrating on the sword, Excalibur, instead of Arthur. Set in a forest (possibly Hampstead) early morning, different shots, possibly on the last shot an actor (who will play Arthur) walking towards the stone.
Rigging: Tentacle


We first had to model a tentacle by bringing in a cube and resizing it. Then we added a skeleton and binded the skin to it. After that, we brought in 3 nurbs circles and oriented them to the joints of the skeleton.

To add an animation to the tentacle I edited the expression in the transform attributes menu and then by adding some code I was able to achieve this.


Then by using MASH, I was able to multiply the tentacle and add it to a poly sphere.
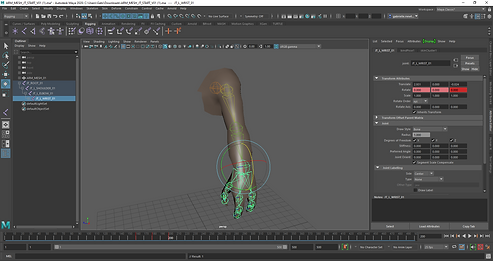
Joint Creation - ROBOT


We started by playing around with the joint tool and creating an arm and attaching the joints and skeleton to the modeled arm.


For the second part of the lesson, we were given a modeled robot. We then had to create a skeleton and place them correctly in the joints of the robot. Then we parented everything together.


Skinning - Arm


Assessment 1


For my assessment, I wanted to model a small cute robot and and texture it in substance. Everything was going to plan until I tried bringing the substance textures into Maya. So I started again.


I decided to re-model as my original model wasn't "straight". Once modeled and textured in Arnold, I started rigging. After creating the joints on the one side and created the joints for the spine, renamed everything so I could mirror them to the other side and I parented the legs and arms to the spine joints. I then parented them to the mesh. For some reason I encountered some problems so I had to do a basic animation that only moved the arms and legs. I then created walls and a ground, added an Arnold skylight and rendered it out with Arnold renderer. I brought the jpeg files into premiere pro and then created a mpeg file.

Assessment 2


I started modelling my sloth in Zbrush. I started with the main body and once i was happy with that, I added eyes and then modeled the claws. I decimated everything and exported a High and Decimated version out. I then started working on the retopology of the model so I could have better geometry. I then worked on the UVs by cutting and sewing and making sure they look good enough to apply texture. Next was rigging and I then tried to work on painting weights but I feel like I wasn't successful. I brought the retopo'd mesh into substance to try and and achieve a sloths face. Once I was happy, I brought the textures back into Maya and applied them successfully onto the model. I opened the XGen part of Maya and started applying hairs onto the model, once I was happy with the length and thickness (I tried to remove the hairs on the face but wasn't successful). I then used the colours already provided in Xgen and tried to make it match with the face. I then clumped the hair to make it look like real sloths hair. Then I modeled a tree and textured that and then used a HDRI texture for the background. I did a short video of the sloth moving, but since I wanted a realistic sloth, I wanted realistic movement which means I had to make sure the sloth moved very slowly.